
If your cat loves to scratch the sofa, your legs, or your favorite curtains, it might be time for a nail trim. But many cat owners hesitate — what if you hurt your cat, or she hates the process?
The good news is that trimming your cat’s nails at home is totally doable — once you understand how to do it calmly, safely, and confidently. This guide covers everything from understanding your cat’s claws to the right tools, technique, and after-care tips.
Why Trimming Your Cat’s Nails Is Important
Cats’ claws grow continuously, and if left untrimmed, they can:
- Curl into the paw pads and cause pain or infection
- Scratch furniture, carpets, and people
- Get caught in fabric or rugs
- Make walking uncomfortable for older cats
Regular nail care keeps your cat healthy, comfortable, and less destructive around the house.
How Often Should You Trim a Cat’s Nails?
Most cats need a trim every 2–4 weeks depending on:
- Activity level – indoor cats need more frequent trims
- Age – older cats’ nails grow thicker and curl faster
- Scratching habits – if your cat uses a scratching post regularly, trimming needs are reduced
Tip: Check your cat’s claws every couple of weeks — if they look sharp, long, or start catching on fabric, it’s time.
Understanding Cat Nails Before You Start
Each claw has two key parts:
- The nail (clear outer shell) – what you trim
- The quick (pink inner part) – contains blood vessels and nerves
Never cut into the quick — it’s painful and can bleed. If your cat has light claws, the quick is visible as a pinkish line. For dark claws, trim just the sharp curved tip to stay safe.
Tools You’ll Need
Before trimming, gather your supplies so the process stays smooth and stress-free:
- Cat nail clippers or human nail scissors (avoid guillotine-style clippers)
- Styptic powder or cornstarch (to stop bleeding if you cut too far)
- Towel or blanket (for gentle restraint)
- Treats (to reward your cat)
- Calm environment with no loud noises or distractions
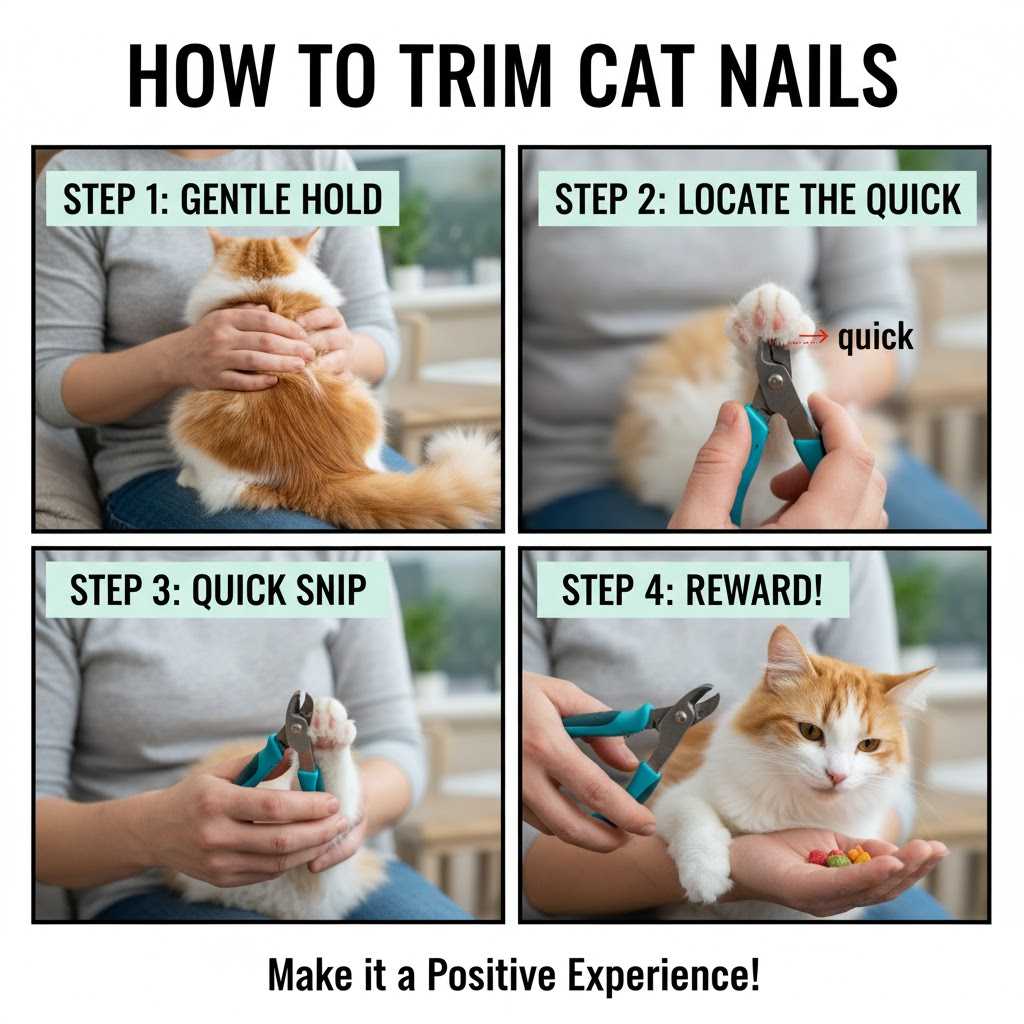
Step-by-Step: How to Trim Your Cat’s Nails Safely
Step 1: Get Your Cat Comfortable
Choose a time when your cat is relaxed — after a meal or nap. Sit on the floor or a chair and let her sit on your lap. Pet her gently and speak softly.
If your cat is nervous, practice touching her paws daily for a few seconds before attempting to cut nails.
Step 2: Position the Cat Securely
Wrap your cat loosely in a towel if needed, leaving one paw exposed. This “kitty burrito” method helps prevent sudden movements.
You can also have a partner hold your cat gently while you focus on trimming.
Step 3: Expose the Claw
Press lightly on your cat’s toe pad to extend the claw. Observe where the clear part ends and the quick begins.
Step 4: Clip Just the Tip
Trim only the sharp, curved end — about 1–2 mm. Avoid the pink area. Make smooth, clean cuts instead of crushing the nail.
Pro Tip: Start with one or two claws per session if your cat resists. Gradually work up to all paws.
Step 5: Reward and Relax
After trimming each paw, offer a treat or a short play session. This creates positive association so next time will be easier.
Step 6: Handle Accidents Calmly
If you accidentally clip the quick:
- Stay calm — your cat will sense panic.
- Apply styptic powder or cornstarch to stop bleeding.
- Skip that paw and resume later once your cat relaxes.
What If Your Cat Hates Nail Trimming?
Some cats won’t cooperate no matter how patient you are. In that case:
- Try trimming one or two claws per day instead of all at once.
- Use cat calming sprays or pheromone diffusers to ease anxiety.
- Trim after playtime when your cat is tired.
- Consider professional grooming for extremely anxious cats.
Signs Your Cat’s Nails Are Too Long
- Clicking sounds when walking on hard floors
- Nails curling toward paw pads
- Scratches on furniture and walls
- Difficulty retracting claws
If you notice any of these, it’s time for a trim.
Common Mistakes to Avoid
- Trimming too short or cutting into the quick
- Using dull or rusty clippers
- Forcing a struggling cat
- Skipping positive reinforcement
- Trimming all claws in one go with a stressed cat
Avoiding these mistakes makes grooming smoother and safer.
How to Trim a Kitten’s Nails?
Start early — kittens adapt quickly. Use small, sharp nail scissors and trim only the very tip. Keep sessions short (under 5 minutes) and always reward afterward.
Should You Declaw Instead?
Absolutely not. Declawing is a painful, permanent surgery that removes part of each toe bone. It can lead to behavioral issues, chronic pain, and litter box avoidance.
Trimming and providing scratching posts is the humane alternative.
Best Scratching Alternatives to Keep Nails Healthy
- Sisal scratching posts
- Cardboard scratch pads
- Cat trees or wall-mounted scratchers
- Catnip sprays to attract your cat to them
Encouraging healthy scratching keeps nails naturally filed and reduces the need for frequent trims.
FAQs
Q1. How can I tell if I cut my cat’s quick?
You’ll see a small drop of blood and your cat may flinch. Apply styptic powder and comfort her — it heals quickly.
Q2. What type of clippers are best for cats?
Use scissor-style clippers with sharp blades. Avoid guillotine-style tools — they can crush the nail.
Q3. Can I use human nail clippers?
Yes, for kittens or small cats, but cat-specific clippers give cleaner results.
Q4. How do I trim a cat’s back claws?
Hold your cat gently on your lap and extend each paw one at a time. Back claws are thicker, so trim a bit less than the front ones.
Q5. Should I file my cat’s nails after trimming?
Not necessary, but you can gently file rough edges if your cat allows it.
Conclusion
Trimming cat’s nails doesn’t have to be a battle. With patience, calm energy, and the right tools, you can make nail care a stress-free bonding routine that protects both your cat and your furniture.
Remember:
- Trim every 2–4 weeks
- Cut only the tip
- Use rewards and gentle handling
- Never declaw — it’s harmful and unnecessary
A little routine grooming goes a long way toward keeping your cat comfortable, healthy, and happy.
